EdgeMesh High Availability
EdgeMesh high-availability architecture is mainly aimed at edge scenarios such as distributed dynamic relay connections and network autonomy of private LANs. It provides relay traffic and hole-punching connection services for nodes to ensure that cluster connections can always be smooth in edge scenarios.
high-availability will short to HA for briefly in the following content
Using HA feature
Introduction to Basic Principles
HA feature has merged the capabilities of edgemesh-server into the EdgeTunnel module of edgemesh-agent, so that edgemesh-agent with relay capability can automatically become a relay server, providing intranet penetration and ervice of relaying and forwarding, the comparison between the old and new system architecture is as follows:
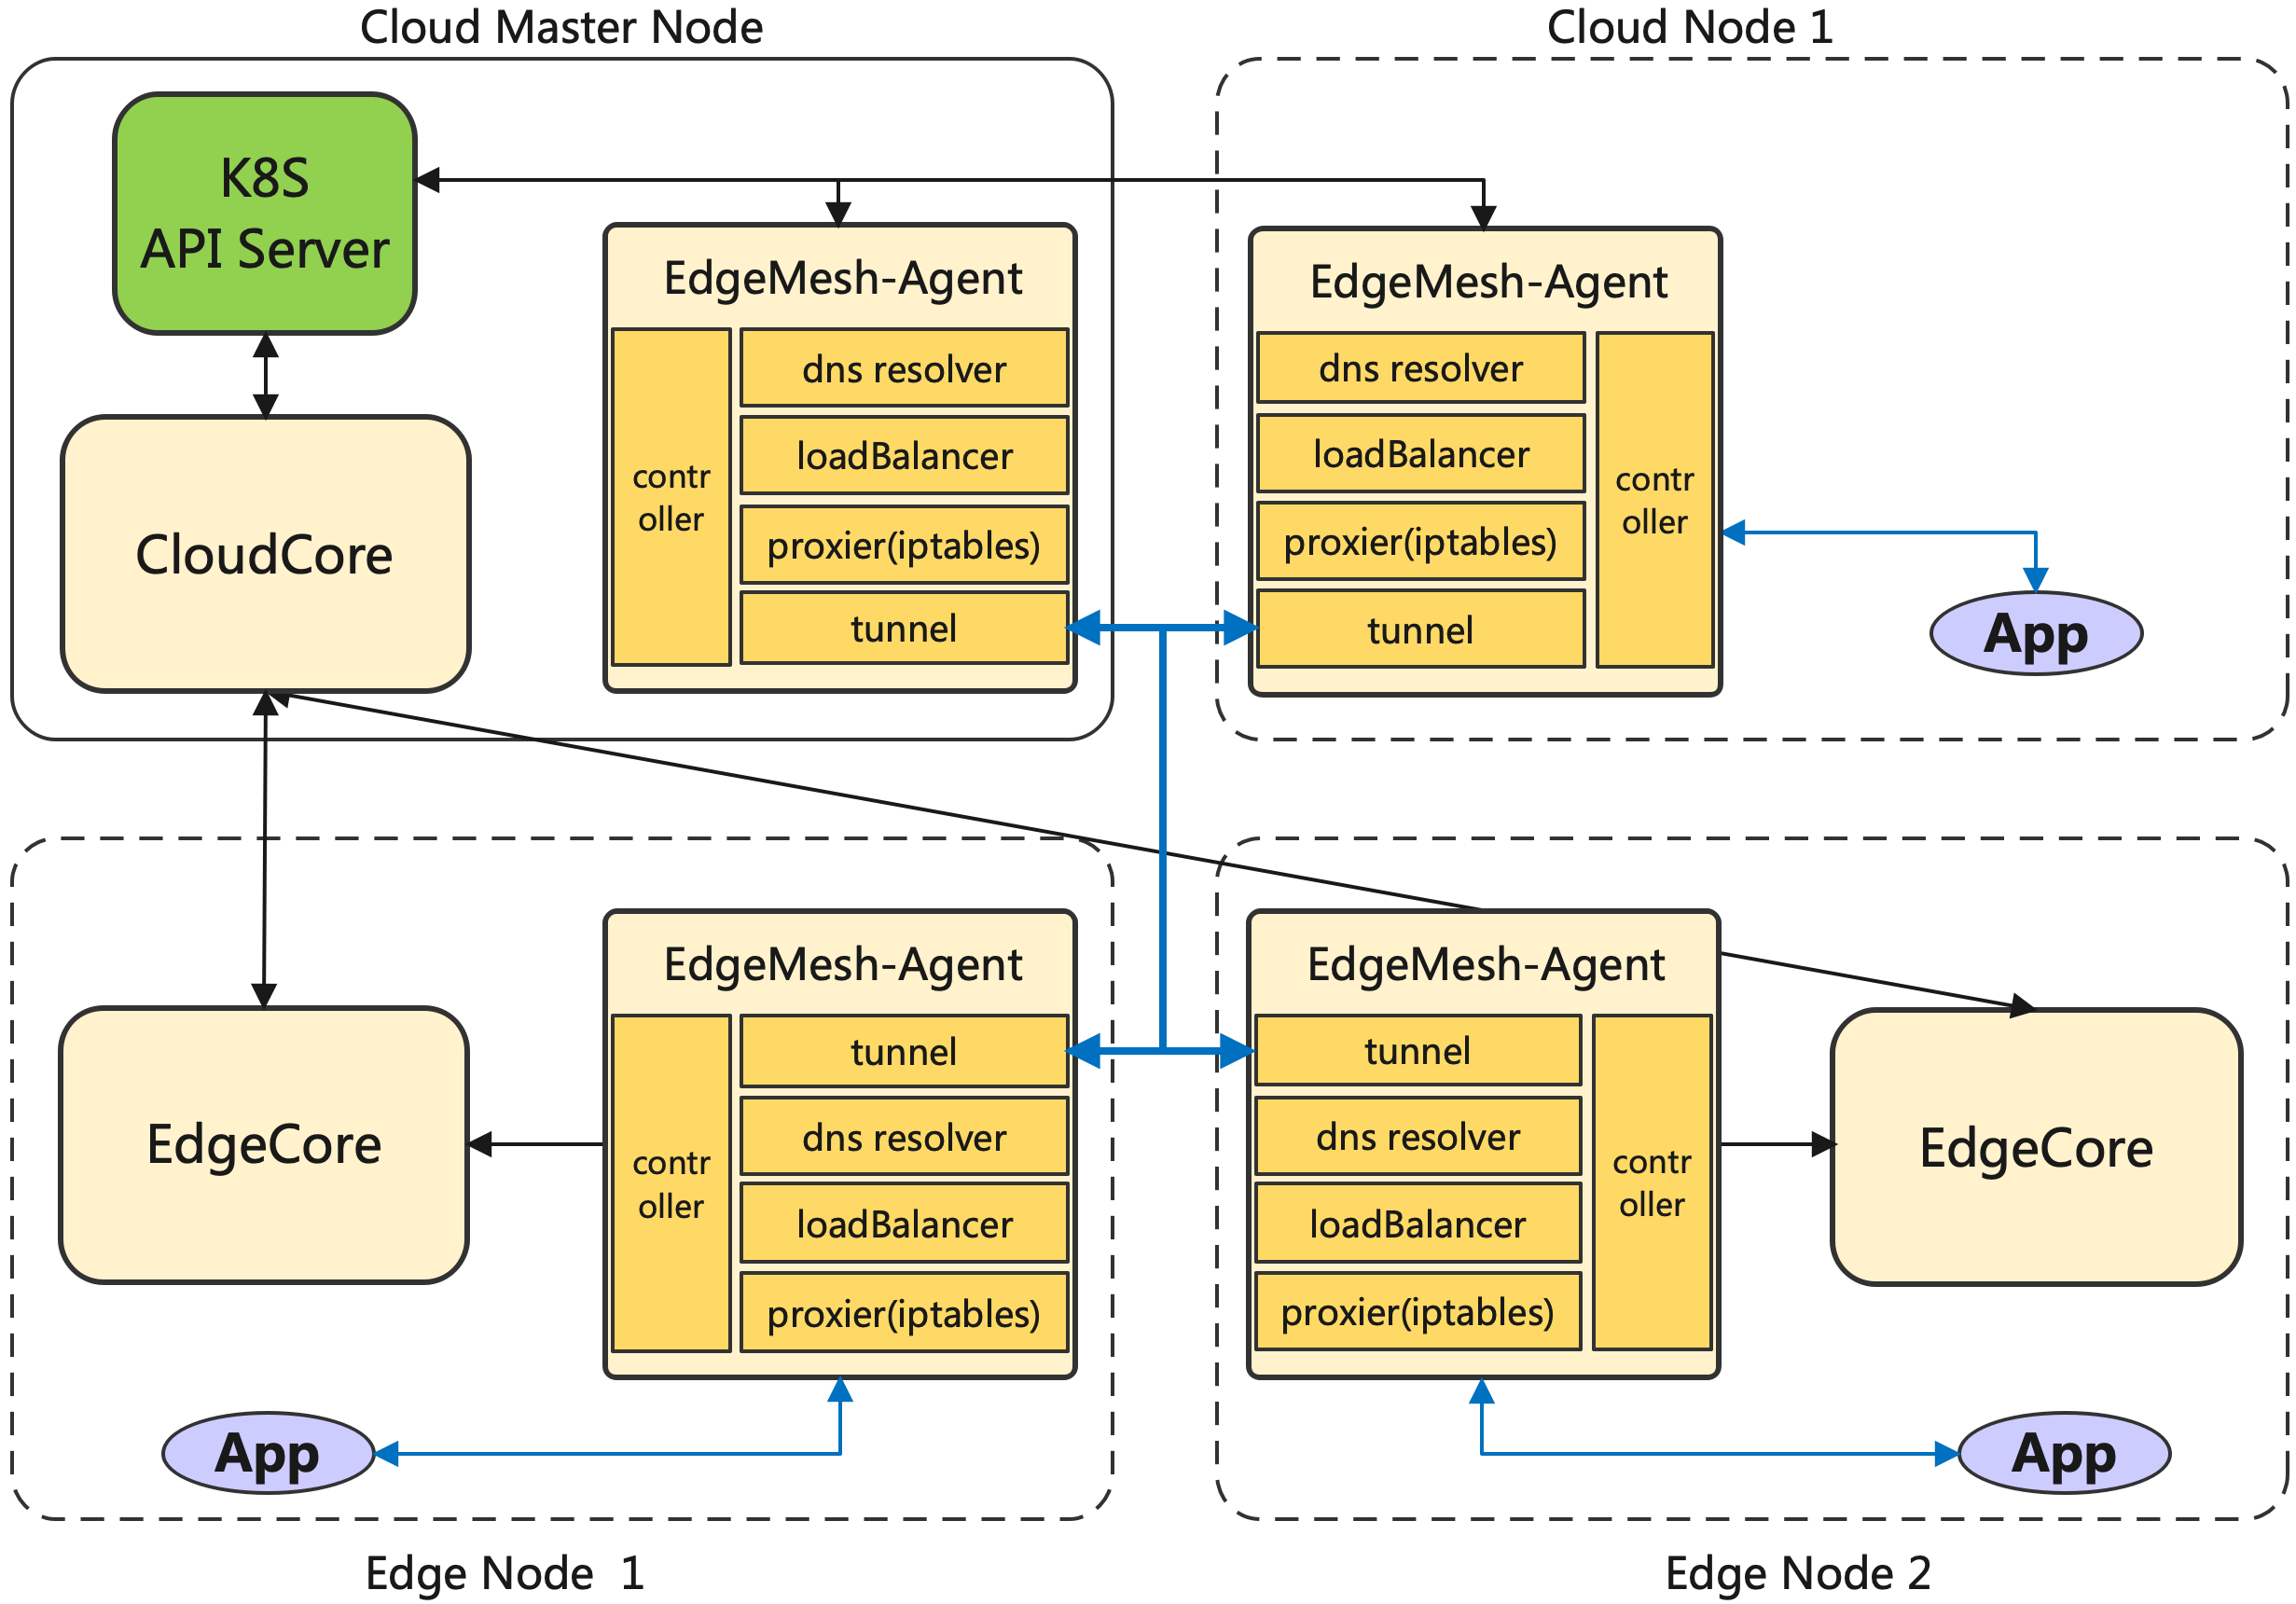
The main idea of EdgeMesh's high availability is: when a node in cluster has relay capability, the edgemesh-agent will assume its role of relay to provide intranet penetration and traffic relay forwarding for other nodes. When the cluster is initialized or a new node joins the cluster, the EdgeMesh system will discover and record the nodes in the local area based on the mDNS mechanism . At the same time, the DHT mechanism will respond to the connection requests from other nodes outside the local area network. When two nodes of LAN want to be connected, the relay node can provide them with traffic relaying and assisting intranet penetration services.
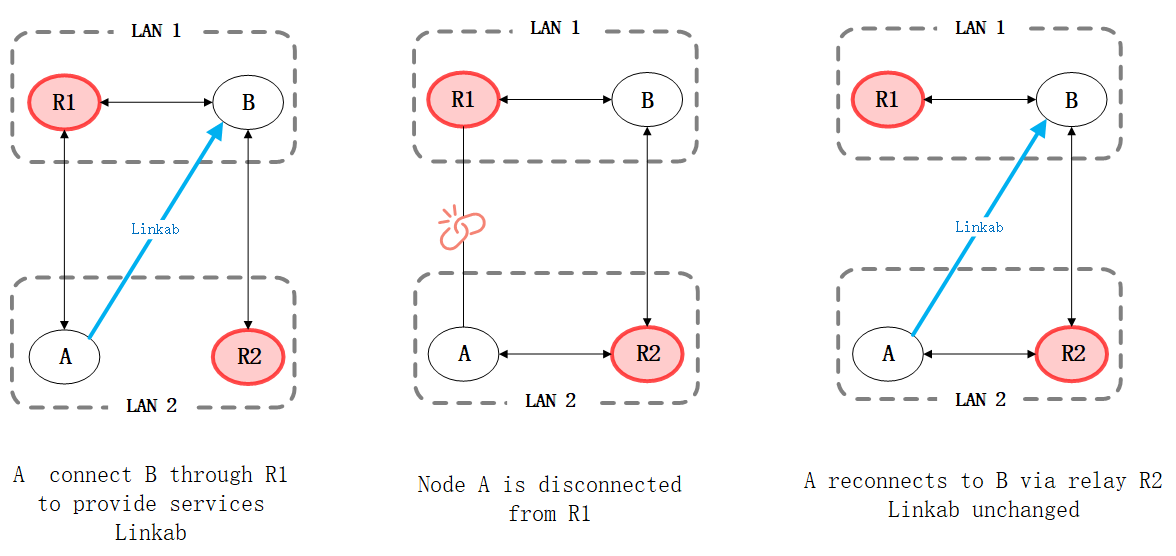
The core of EdgeMesh's HA feature is shown in the figure above. In the cluster, Service Linkab is provided by the connection from A to B through the R1 relay. When the R1 cannot provide relay services, nodes A and B will automatically use the HA feature to provide services by switching to relay R2 and re-establish the connection. During this process, users hardly feel the change of network connection.
Here comes the introduce of using the HA feature in different situations.
Enable high availability during deployment
You can enable the HA feature when installing EdgeMesh through the following configuration methods. During the configuration process, you can set the address of the relay node according to the cluster requirements:
# Enable high availability
helm install edgemesh --namespace kubeedge \
--set agent.relayNodes[0].nodeName=k8s-master,agent.relayNodes[0].advertiseAddress="{1.1.1.1}" \
https://raw.githubusercontent.com/kubeedge/edgemesh/main/build/helm/edgemesh.tgz
2
3
4
relayNodesis the list of relay node . By setting[]relayNode,you can configure it to specify edgemesh-agent in the cluster that should assume the role of relay.relayNode.nodeNameis the parameter using node name to specify its role of relay, which must be the same as the node name of K8s,You can check your k8s node name bykubectl get nodesrelayNode.advertiseAddressis the parameter used to specify the address of the relay node, which should be the same as the IP address of node in the K8s cluster. If you have an IP of the public cloud and attached it to the relay node, thenrelayNode. The advertiseAddressparameter should preferably be filled with the public IP address.
| Name | Parameter Type | Example | Function description |
|---|---|---|---|
| relayNodes[].nodeName | string | --set agent.relayNodes[0].nodeName=k8s-master | Set the node name of the relay node, which should be the same as the nodeName set in the K8S cluster |
| relayNodes[].advertiseAddress | []string | --set agent.relayNodes[0].advertiseAddress="{1.1.1.1}" | Set the node address of the relay node, which should be the same as the node address in the K8S cluster |
It should be noted that the number of relay nodes is specified by the index value num in relayNodes[num], which starts from 0, and relayNodes[0] indicates relay node 1.
For more information on installation and configuration, please refer to:
helm installation : Helm install | EdgeMeshopen in new window
Manual installation : Quick Start | EdgeMeshopen in new window
Add a new relay node at runtime
If you want to add a new relay node to the cluster when using the HA feature of EdgeMesh, you can do it by modifying the relayNodes parameter in edgemesh-agent-cfg. The following are the specific modifications to configure:
kubectl -n kubeedge edit configmap edgemesh-agent-cfg

# Enter the config file to edit
apiVersion: v1
data:
 edgemesh-agent.yaml: |-
   modules:
     edgeProxy:
       enable: true
     edgeTunnel:
       enable: true
       # Set to add or modify as a new relay node
       relayNodes:
       - nodeName: R1
         advertiseAddress:
         - 1.1.1.1
       - nodeName: R2   <------ Add new nodes here
         advertiseAddress:
         - 192.168.5.103
2
3
4
5
6
7
8
9
10
11
12
13
14
15
16
17
18
19
After that, you can use kubeadm join or keadm join to add a new relay node R2, and then check whether the added relay node is running normally :
# Check whether the node is running
kubectl get nodes
NAME         STATUS   ROLES                  AGE    VERSION
k8s-master   Ready    control-plane,master   249d   v1.21.8
k8s-node1    Ready    <none>                 249d   v1.21.8
ke-edge1     Ready    agent,edge             234d   v1.19.3-kubeedge-v1.8.2
ke-edge2     Ready    agent,edge             5d     v1.19.3-kubeedge-v1.8.2
R2           Ready    agent,edge             1d     v1.19.3-kubeedge-v1.8.2 <------ New Node


# Check whether the edgemesh-agent of the relay node is running normally
kubectl get all -n kubeedge -o wide
NAME                       READY   STATUS    RESTARTS   AGE   IP              NODE         NOMINATED NODE   READINESS GATES
pod/edgemesh-agent-59fzk   1/1     Running   0          10h   192.168.5.187   ke-edge1     <none>           <none>
pod/edgemesh-agent-hfsmz   1/1     Running   1          10h   192.168.0.229   k8s-master   <none>           <none>
pod/edgemesh-agent-tvhks   1/1     Running   0          10h   192.168.0.71    k8s-node1    <none>           <none>
pod/edgemesh-agent-tzntc   1/1     Running   0          10h   192.168.5.121   ke-edge2     <none>           <none>
pod/edgemesh-agent-kasju   1/1     Running   0          10h   192.168.5.103   R2           <none>           <none> <------ new edgemesh-agent running on R2
2
3
4
5
6
7
8
9
10
11
12
13
14
15
16
17
18
Convert node to relay node at runtime
If you want to convert some existing nodes into relay nodes during the cluster running process, you only need to modify the relayNodes parameter in edgemesh-agent-cfg. The following is the specific modification configuration Way:
kubectl -n kubeedge edit configmap edgemesh-agent-cfg

# Enter the config file to edit
apiVersion: v1
data:
 edgemesh-agent.yaml: |-
   modules:
     edgeProxy:
       enable: true
     edgeTunnel:
       enable: true
       # Set to add or modify as a new relay node
       relayNodes:
       - nodeName: R1
         advertiseAddress:
         - 1.1.1.1
       - nodeName: R2   <------ Configure new node information here
         advertiseAddress:
         - 192.168.5.103
2
3
4
5
6
7
8
9
10
11
12
13
14
15
16
17
18
19
After modifying this configuration, you need to restart edgemesh-agent on the R2 node (target node). In this process, assuming that the R2 node has relay capability, the following logic will be executed when the Tunnel module is re-run:
edgemesh-agent will read list of relayNodes in the configmap to check whether it is set as a relay node by the user. If R2 exists, it means that R2 is set as the default initial relay node.
The edgemesh-agent on the R2 node will try to become a relay and start the corresponding relay function.
If it is found that the node does not have the relay capability (generally, the node with the public IP address has the relay capability), then the node still cannot assume the role of the relay node. The reason for this result may be the advertiseAddress of the node Not all nodes can access it.
High Availability Feature Application Scenario
The main purpose of the HA architecture is to ensure the stability of the system and improve the overall performance of the system. The HA feature of EdgeMesh covers a variety of edge network pain-point scenarios based on the original functions. The following are the specific application scenarios of the EdgeMesh HA feature in edge computing scenarios. You may understand the services provided by this feature based on these use cases.
Single point of failure and high load scenarios
As shown in the figure, when a single node assumes the relay service, all other nodes need to connect to this node to obtain the service of the network connection. In such a scenario, the load of a single node will increase accordingly. Excessive communication load or dense connections are the main reasons for limiting service performance in many cases. At the same time, if the node fails, it will lead to medium The relay connection is disconnected, causing the relay connection function to temporarily stop.
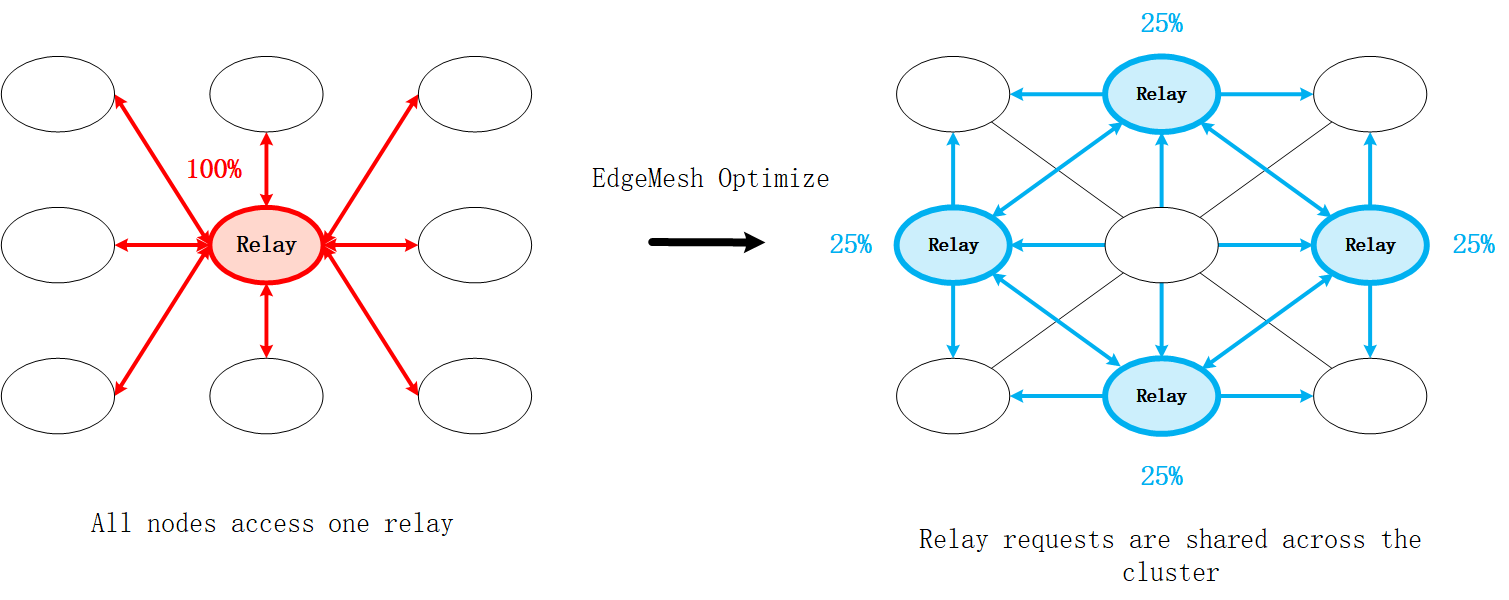
In order to optimize this part of the problem and cover high-load access scenarios, the new version of EdgeMesh considers the idea of using distributed network connections. By giving each node a structure that can provide relay functions, each node has the ability to provide intermediate services for other nodes. ability to continue.
For this part of the scenario requirements, users can specify multiple specific nodes as the default relay nodes when the cluster is initialized, and adjust the load distribution within the cluster according to their own conditions. EdgeMesh will give priority to trying to connect to these nodes when providing relay services. Node; if no settings are made, EdgeMesh will also find a suitable node to perform the relay function, decentralizing and reducing the relay access burden of a single node.
Distributed Dynamic Relay Connection Scenario
As shown in the figure, edge applications A and B in Shanghai communicate with each other through relays, and the traffic needs to be forwarded to the relay node in the Beijing data center. The delay is long and the user experience is poor. Unfortunately, in edge computing scenarios, the cluster scale is often deployed across multiple locations or regions. If the relay node is very far away from the node requesting the service, it will cause a great delay and affect the user experience, especially in this case. It is especially obvious when the relay connection object and itself are in adjacent geographical locations.
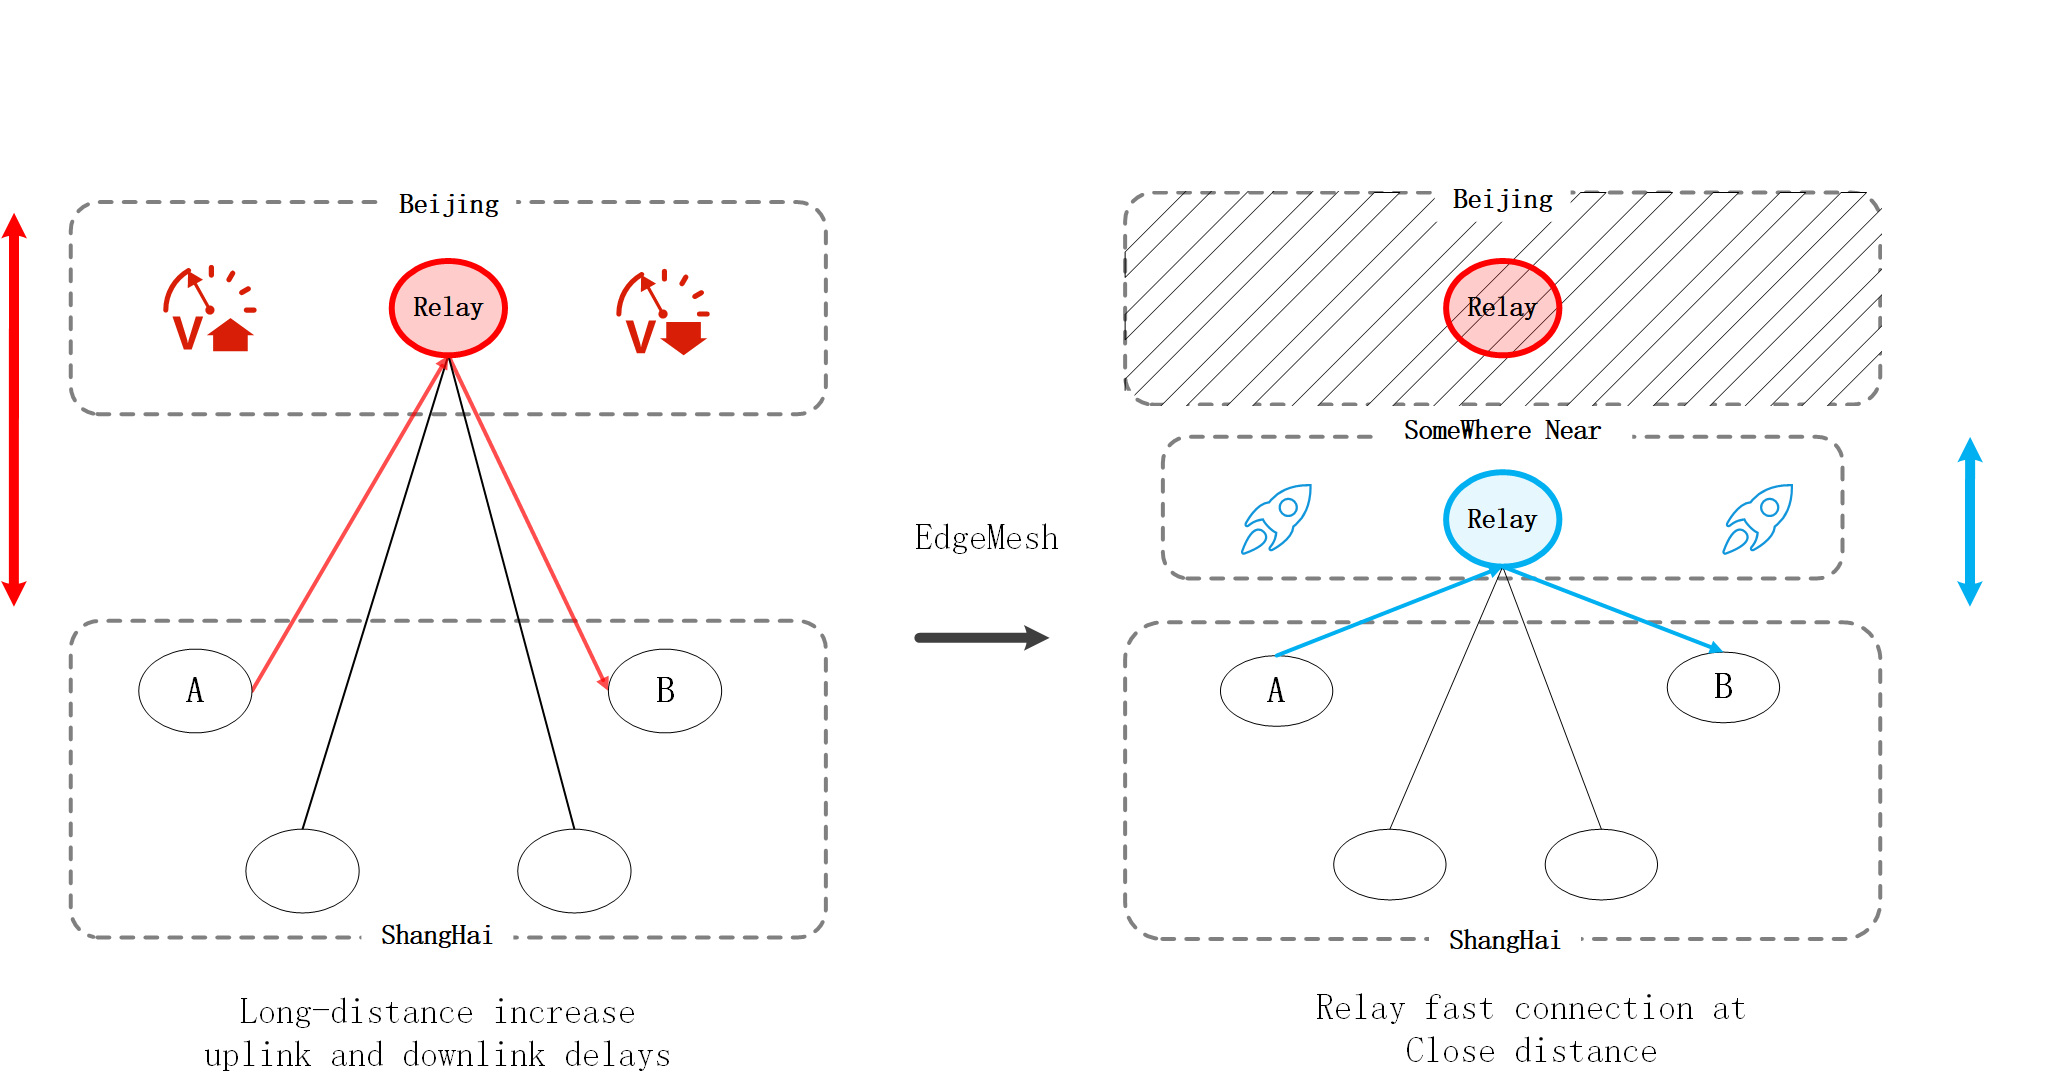
In order to optimize this part of the experience and cover long-distance service scenarios, the new version of EdgeMesh considers the principle of nearby relays. Users can select a relay node with a moderate geographical location according to the geographical distribution of cluster nodes. When the application needs the relay connection service, the edgemesh-agent will dynamically select the nearest relay node as the relay to provide the network connection service, so as to shorten the delay of the relay service.
Private LAN Network Autonomous Scenario
As shown in the figure, in the code implementation of the old version of EdgeMesh, the edgemesh-agent must maintain the connection with the relay service edgemesh-server on the cloud. When the node in the LAN goes offline, the edgemesh-agent is disconnected from the relay node. If the connection is disconnected, the service on the disconnected node will completely lose the ability to proxy traffic, which will cause great trouble to users in some private local area networks or in environments with large network fluctuations.
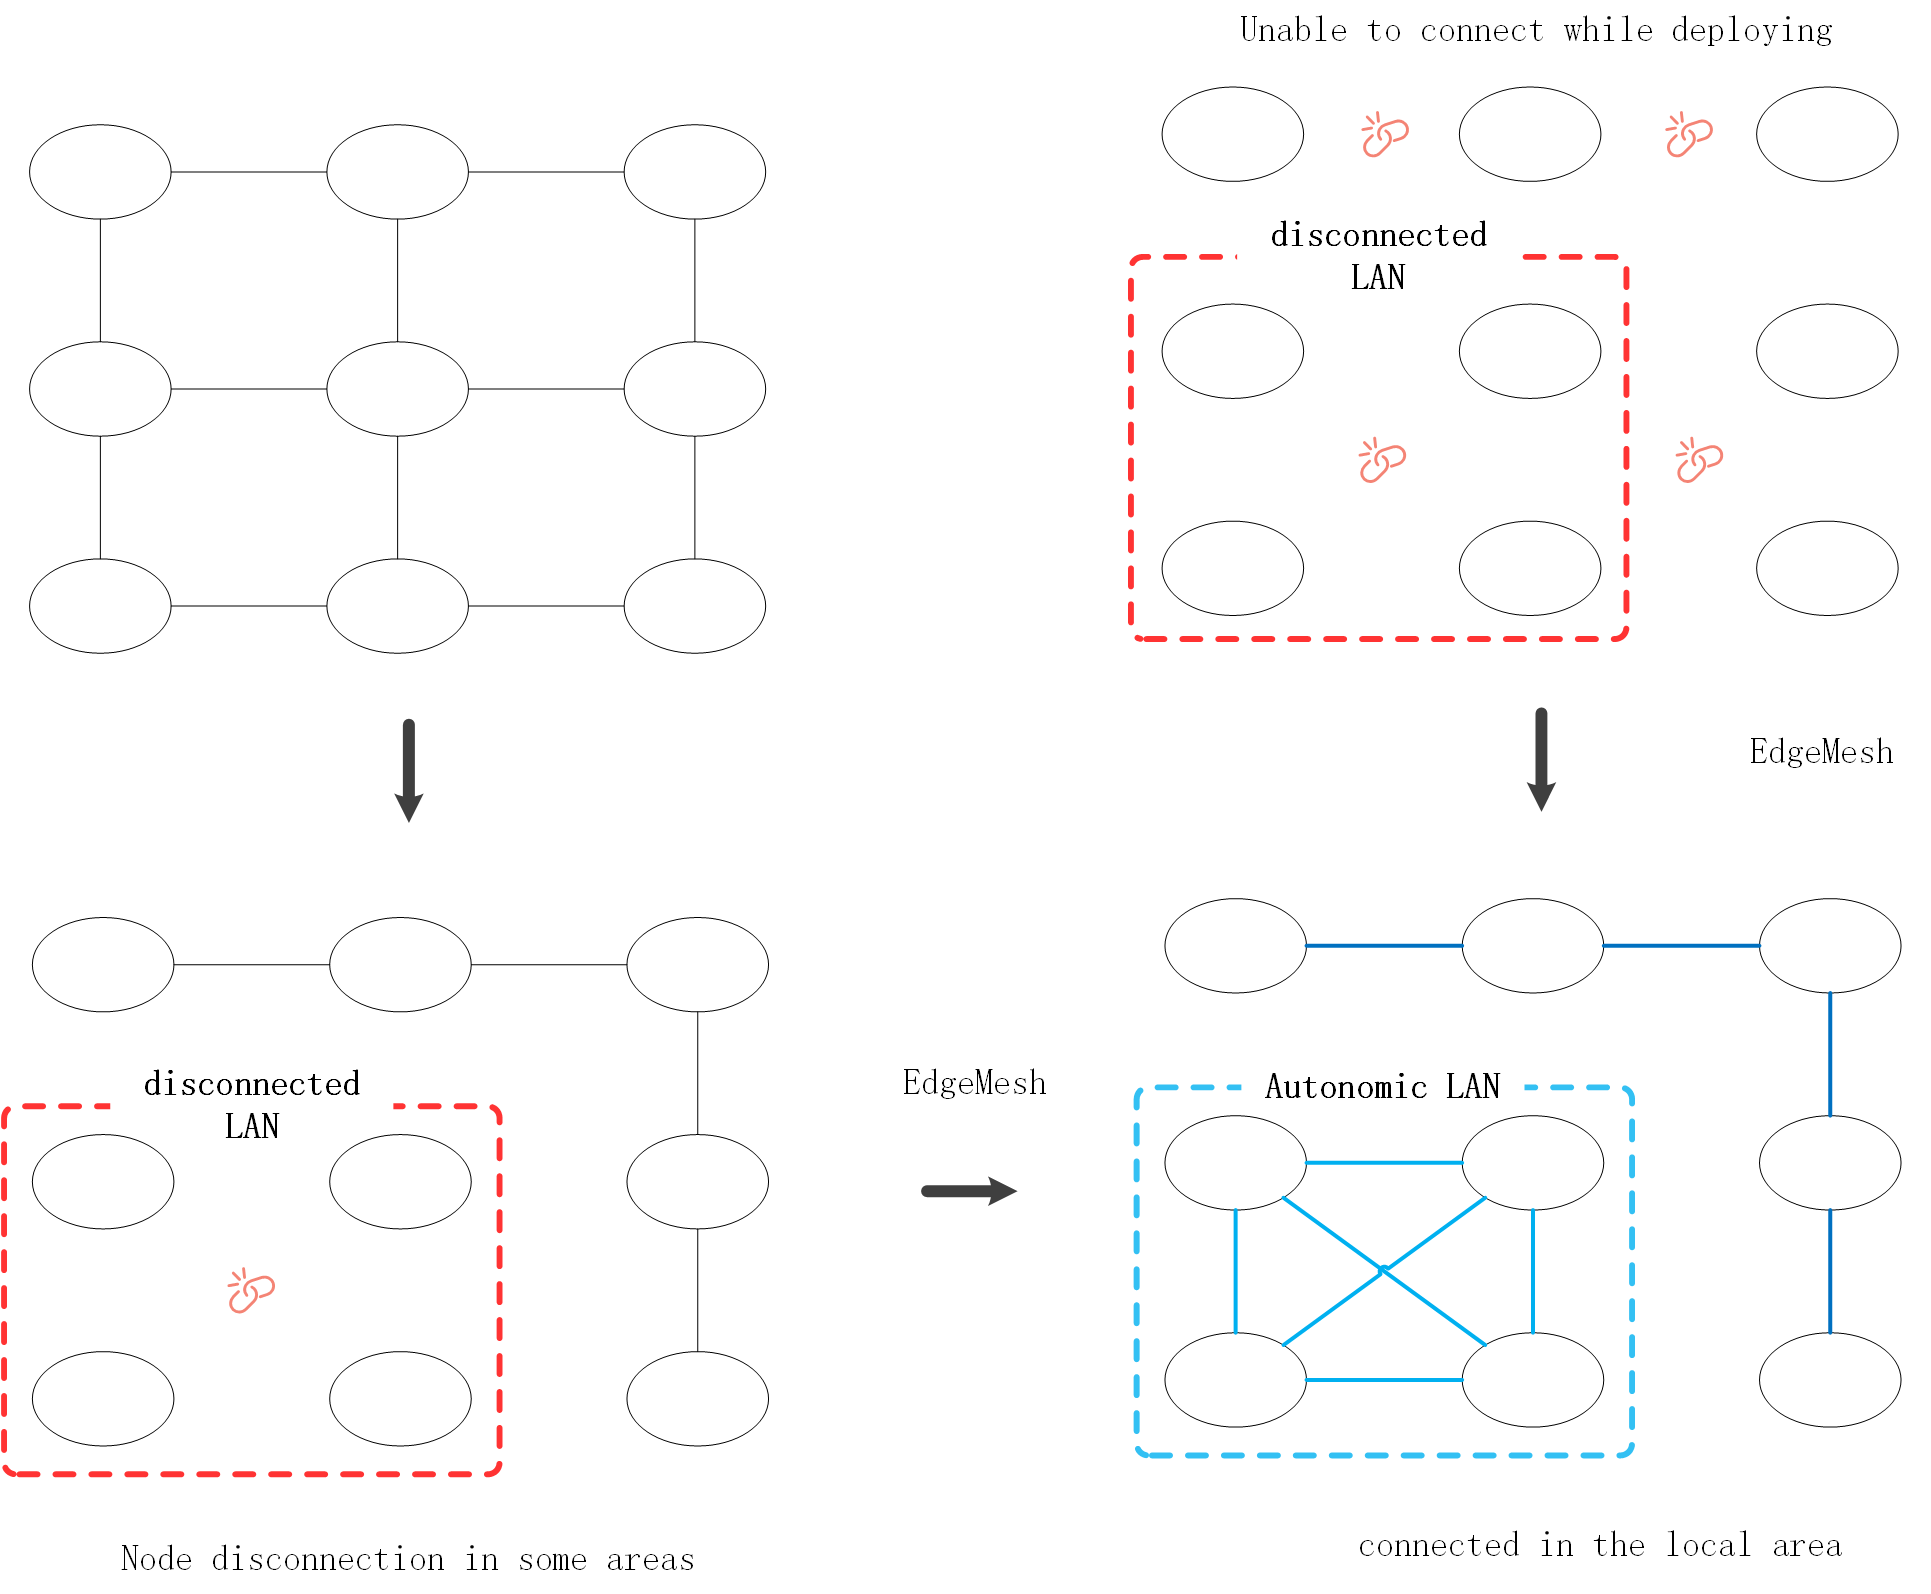
In order to optimize this part of the problem and improve the stability of network application connections, the new version of EdgeMesh considers the idea of distributed management and network autonomy, so that EdgeMesh can use the mDNS mechanism to ensure the connection between nodes in a private local area network or an offline local area network. Discover and forward traffic to each other to maintain the normal operation of application services.
For this part of the scenario requirements, the user does not need to set any parameters to enable this function. This function generally faces two situations for service maintenance.
- When EdgeMesh was just deployed, some nodes were already under the private local area network, so the nodes in this local area network can still access and forward traffic between each other through EdgeMesh
- During the normal operation of the cluster, after some nodes are offline, these nodes can still maintain network connection and traffic forwarding between each other through EdgeMesh.